Comments Off on How to Build a High-Converting Systeme.io Landing Page in 15 Minutes (Beginner Guide)
If you’ve ever stared at a blank landing page and felt that quiet wave of overwhelm, you’re not alone. Most beginners think they need perfect design skills, some hidden marketing formula, or hours of tinkering to build a page that actually converts. Systeme.io flips that idea on its head.
This platform works beautifully for beginners because it’s intentionally simple. The editor guides you toward cleaner layouts, faster decisions, and fewer dead ends. And when you remove the clutter and second-guessing, something interesting happens: conversions go up. Visitors take action more quickly because they aren’t drowning in distractions.
Systeme.io’s structure naturally keeps you focused on what matters—your message, your offer, and the small handful of elements that turn a curious visitor into a new lead. This guide walks you through the exact process to create a polished, conversion-ready landing page in about fifteen minutes… even if you’ve never built one before.
Choosing the Right Systeme.io Template for Your Goal
Your landing page’s success starts with one simple choice: picking the right template. Beginners often scroll endlessly, trying to find “the perfect one,” but the truth is far less stressful. You just need a template that matches the goal of your page—nothing more.
Here’s the simplest way to think about it:
If you want email subscribers → choose a lead generation template.
If you want sales → choose a sales page template.
If you’re building hype → choose a waitlist or coming soon template.
You’re looking for clarity, not complexity. The best beginner templates have:
A strong hero section
One clear call to action
A straightforward layout
Minimal extra sections
What you don’t want is a template with a dozen sections, multiple CTA paths, or heavy design elements you’ll need an hour to figure out. Keep it simple. Simple converts.
Understanding the Systeme.io Editor (And Which Blocks Actually Matter)
The editor inside Systeme.io is easy to get comfortable with, but beginners often click into every block and wonder what’s safe to touch. Here’s the truth: only a few elements shape the entire conversion experience.
The essential blocks you’ll rely on
Headline – This tells your visitor why they should care.
Text – This expands on the benefit in a clear, human way.
Image – Should reinforce your offer, not distract from it.
Button – Your primary action driver.
Form – The moment where the visitor becomes a lead.
Everything else is optional seasoning—not the meal.
Blocks to treat with caution
Carousels
Background video sections
Busy multi-column layouts
Large spacer blocks
These tend to make pages feel noisier and break more easily on mobile, which is where most of your visitors will land.
Building Your First High-Converting Systeme.io Landing Page (Step-by-Step)
Let’s walk through the process as if you and I were building the page together—no fluff, just the pieces that matter.
Step 1: Write a Headline That Gives Visitors a Reason to Stay
Your headline is the hinge the entire page swings on. Think of it as a promise. Clear, specific, and rooted in the transformation you’re offering.
You don’t need poetry. You need clarity.
Examples that work beautifully:
“Get the Free Checklist That Helps You Launch Your Online Business in 7 Days”
“Discover the Simple 3-Step System to Start Making Money Online — Even If You’re a Complete Beginner”
“Download the Beginner Funnel Blueprint That Makes Setup Simple”
“Join the Challenge That Kickstarts Your Affiliate Journey Today”
Visitors don’t respond to features. They respond to outcomes.
Step 2: Build a Clean, Easy-to-Scan Layout
Above the fold, aim for:
A headline
A short, supportive subhead
A button or form
A simple visual
Everything below the fold should feel like a gentle nudge, not a lecture. Resist the urge to add too many sections. Beginners convert best with less, not more.
Step 3: Use the Right Visual
Your image should help visitors imagine what they’re about to receive. Pick visuals that feel like a real extension of your offer, not random decoration.
The best choices include:
Ebook or checklist mockups
Course or video thumbnails
A clean, friendly photo
Device mockups with previews
Avoid glossy stock images—they don’t build trust, they dilute it.
Step 4: Keep Your Form Short
If your goal is lead generation, don’t complicate the form. Every extra field creates a moment of hesitation.
Required:
Email
Optional:
First name
That’s it. Simplicity wins.
Step 5: Add Micro-Copy That Helps Visitors Take the Leap
Short reassurance phrases make an outsized impact because they address the tiny worries people rarely say out loud.
Add small notes like:
“You can unsubscribe anytime.”
“No credit card required. Instant access. Perfect for beginners.“
“No spam—ever.”
“Instant access inside your inbox.”
This kind of language softens the friction and makes the action feel safe.
Step 6: Use a CTA That Sounds Like the Visitor’s Voice
“Submit” is robotic. “Get Instant Access” feels like a step forward.
A few reliable go-tos:
“Send Me the Guide”
“Get Instant Access”
“I Want This!”
“Show Me How to Start”
First-person CTAs consistently outperform generic ones because they reinforce the user’s sense of agency.
Easy Systeme.io Enhancements That Make a Big Difference
Use Timers With Intention
A timer can strengthen urgency, but only when the deadline is real. If you use one on a normal, evergreen freebie, it backfires.
Good uses:
Challenge registration closing
Limited-time bonuses
Real launch windows
Bad uses:
Everyday lead magnets
Evergreen offers
Anything fake or forced
Visitors feel the difference instantly.
Add a Short Video to Build Trust
If you’re comfortable turning on the camera, a 30–60 second video can transform how people react to your page. You don’t need high production—just a real explanation of who the page is for and why the offer is worth their time.
Authenticity beats polish. Always.
Make Sure Your Page Passes the Mobile Test
Grab your phone and load the page. You’re looking for:
Clean spacing
Easy-to-read headline
Buttons big enough for thumbs
A form that isn’t squeezed
A page that doesn’t feel overwhelming
If a visitor can understand your offer within the first five seconds on mobile, you’re in excellent shape.
Copywriting Tips Tailored Specifically to Systeme.io’s Structure
Benefit Stacking
Paint a picture of what changes after they opt in.
Not: “Download my email marketing guide.”
Better: “Learn the 5-step email system beginners use to double their affiliate income.”
Build a Hero Section That Tells a Story Quickly
The strongest hero sections follow a simple rhythm:
What they want
Why it matters
What they get
How to get it
It’s a subtle narrative arc, but visitors feel it instantly.
Use CTA Scripts That Spark Action
Try action-based, first-person language like:
“Give Me Instant Access”
“Let’s Start This”
“Send It to My Inbox”
These create a sense of momentum and commitment.
Beginner FAQs for Systeme.io Landing Pages
How long should my landing page be? Short. Most top-performing beginner pages have two to four small sections.
Can I use more than one CTA? One CTA, repeated. Not multiple choices.
Should I link to other pages? Avoid it. Every extra link leaks conversions.
Do I need long copy? Not for lead magnets. Short, benefit-driven copy wins.
Does design matter? Yes, but clarity always beats aesthetics.
Products / Tools / Resources
Systeme.io – Your all-in-one platform for funnels, email marketing, automation, and landing pages.
Canva – Perfect for creating ebook mockups, thumbnails, and simple visuals for your landing pages.
Unsplash & Pexels – Free, high-quality images when you need clean and minimal visuals.
Squoosh.app – Compress your images before uploading to keep pages fast on mobile.
Notion or Google Docs – Great for writing and storing your page copy before you paste it into Systeme.io.
Comments Off on 7 Proven Ways to Find Undervalued Crypto Gems Before They Explode
Every cycle has its legends — the tokens that nobody is paying attention to until suddenly everyone is. They’re quiet, overlooked, sometimes even dismissed. And then one day, they erupt.
Those dramatic price moves aren’t random. They follow patterns. They follow human behavior. And most importantly, they follow data — data that appears long before the breakout happens.
Spotting undervalued crypto gems isn’t about luck. It’s a skillset grounded in understanding how markets misprice assets, how narratives form, and how early signals show themselves in both on-chain and off-chain activity.
Below are seven proven methods professionals use to find undervalued crypto gems early — with a subtle note on a tool that can help accelerate your research if you’re serious about doing this effectively.
1. Why Undervalued Crypto Gems Even Exist (And Why Most People Miss Them)
Crypto markets are emotional, fast-moving, and influenced heavily by narrative waves. This creates an environment where strong projects can remain undervalued simply because they haven’t entered the spotlight yet.
Quiet Projects Go Unnoticed
Most early-stage projects lack:
Influencer hype
Exchange listings
Large marketing budgets
Yet they often have dedicated teams quietly building.
Retail Bias Causes Blind Spots
Retail investors chase what’s already moving. By the time a token appears everywhere on social media, the early opportunity is gone.
Fundamentals Improve Before Price
A project can gain users, expand partnerships, and ship updates for months before the market catches on.
Your advantage is spotting that early.
2. Compare Market Cap vs Fully Diluted Valuation (FDV)
This single valuation lens helps filter out the majority of bad opportunities.
Market Cap Reflects Today
Only circulating supply matters here.
FDV Reveals Tomorrow
If a token has a tiny circulating supply but massive incoming unlocks, selling pressure could crush the price.
Healthy Undervalued Projects Often Have:
Reasonable FDV
Fair emissions
Sustainable tokenomics
This ensures long-term potential rather than short-lived pumps.
3. Use On-Chain Activity to Spot Momentum Early
On-chain data reveals what’s happening beneath the surface. It shows the behavior of real users, real liquidity, and real investors — long before hype builds.
Unique Wallet Growth
Steady increases in holders typically indicate legitimate interest.
Smart Money Accumulation
When experienced wallets begin accumulating quietly, it’s rarely random. This is one area where specialized tools can help streamline your research.
For example: The Crypto Underworldoffers a simplified way for beginners to understand early DeFi activity and track lesser-known tokens before they expand to larger platforms. It doesn’t replace deep research — but it can help newer investors navigate early-stage DeFi with more confidence, especially when learning how to identify potential gems in their infancy.
Liquidity Depth & Bridging Patterns
Growing liquidity, cross-chain expansion, and balanced pool depth often signal a project preparing for larger exposure.
4. Do the Off-Chain Research Most Traders Ignore
Off-chain fundamentals often reveal the true strength of a project.
Team Track Record
A credible team is one of the strongest predictors of long-term viability.
GitHub Activity
Healthy projects have consistent commits and visible progress.
Roadmap Execution
Execution matters more than grand promises. Solid teams deliver quietly, consistently, and without sensationalism.
5. Evaluate Token Utility and Ecosystem Fit
A token’s purpose determines its long-term value.
Real Utility Matters
Ask: If this token disappeared tomorrow, would anything break?
If the answer is yes, the project has inherent value.
Ecosystem Momentum
Tokens aligned with strong sectors — AI, DePIN, RWAs, gaming infrastructure — tend to compound faster.
Meaningful Integrations
Look for partnerships with reputable ecosystems and real use cases, not superficial announcements.
6. Disqualify Red Flags Immediately
Even if a token looks undervalued, certain issues make it uninvestable.
🚩 High FDV Without Utility
Future dilution risk.
🚩 Large Unlock Cliffs
Heavy selling pressure ahead.
🚩 Anonymous Teams + No Audit
Too much risk for too little reward.
🚩 Marketing Over Development
A major red flag for long-term sustainability.
7. Build a Portfolio Strategy That Survives Volatility
Even the best gems won’t perform well without proper portfolio management.
Position Sizing
Small caps don’t require large allocations to deliver strong results.
Set Your Exit Strategy Before You Enter
Remove emotion from your decisions.
Allocate According to Volatility
Match your risk to the nature of the asset.
FAQs
What makes a token undervalued? When its development, usage, or adoption significantly exceeds its current price.
Are low market cap coins always undervalued? Not at all — fundamentals matter more than numbers.
How fast do undervalued tokens explode? Some move fast; others develop quietly for months.
Can tools help identify gems earlier? Yes — tools that simplify early-stage DeFi discovery can be helpful, especially for beginners.
Products / Tools / Resources
Below are helpful resources for identifying undervalued crypto gems more efficiently:
The Crypto Underworld— A beginner-friendly system that teaches how to explore the DeFi market and spot early-stage tokens before they go mainstream. Ideal for new traders learning how to navigate DeFi, evaluate low-cost tokens, and understand early momentum signals.
CoinGecko / CoinMarketCap — Market cap and tokenomics reference
TokenUnlocks — Track unlock schedules
Dune Analytics — Build custom on-chain dashboards
Nansen / Arkham — Advanced wallet and inflow tracking for intermediate users
If you spend any time creating videos—whether for YouTube, online courses, brand content, or your personal library—you’ve probably noticed how chaotic the modern video world has become. Every platform wants a different format, different resolution, different bitrate. Phones shoot in one codec, editing apps want another, and social platforms compress your content so aggressively that your hard work can end up looking like a blurry mess.
That’s why video converters aren’t “nice utilities” anymore. They’re the quiet engines keeping creators, marketers, teachers, and everyday users afloat.
But when someone is choosing a converter, their brain is doing more than scanning features. They’re thinking:
Will this tool break my workflow?
Will I actually understand how to use it?
Can I trust it not to ruin my video quality?
Does this save me time, or add more steps?
Most converters fail one of those tests. A handful pass. And then there’s the rare tool that hits every mark without shouting about it—HD Video Converter Factory Pro.
HD Video Converter Factory Pro: Core Strengths
HD Video Converter Factory Pro doesn’t try to wow you with hollow marketing. It wins by quietly doing a lot of things very, very well.
Speed Benchmarks & Compression Efficiency
This software leans on GPU acceleration, which is just a technical way of saying: it moves fast. Even on modest machines, conversions happen quicker than you expect. That’s a big deal when you’re dealing with:
4K footage
Batch conversions
Slow-motion or high-bitrate files
What stands out most is the compression efficiency. You can shrink a huge video into a smaller file without the usual mushy loss of detail. Most converters force you to choose between speed or quality. This tool somehow maintains both.
Supported Formats & Device Presets
More than 500 formats. More than 300 device presets. Newer codecs. Legacy ones. All the usual suspects like H.264 and H.265—plus VP9 and other modern formats.
But what matters is how it feels to use: You load a video, pick your device or platform, and you’re done. No intimidation. No codec gymnastics.
Useful Tools Competitors Overlook
Here’s where HD Video Converter Factory Pro quietly becomes a whole workflow:
Built-in downloader
Screen recorder
Lightweight editor
GIF creator
Slideshow builder
Batch compression tools
Most competitors make you pay extra for these features. This one doesn’t.
A User Experience That Doesn’t Get in Your Way
Some video tools bury you under menus and settings. HD Video Converter Factory Pro does the opposite. Its UI is intentionally simple—almost deceptively so. You open it, click what you need, and you’re moving.
Beginners don’t feel overwhelmed. Advanced users don’t feel slowed down. It’s a difficult balance, but the software pulls it off.
Competitor Breakdown: Side-by-Side Analysis
Let’s look at how the tool stacks up against the biggest names.
HitPaw Video Converter
Clean, modern interface. Nice features. But the pricing creeps up fast, and the speed doesn’t quite match.
Any Video Converter
A familiar name with a free version, but it’s had a troubled reputation due to bundled extras and inconsistent performance.
Movavi Video Converter
Sleek, polished, and extremely friendly. But it gets expensive quickly, especially if you need the more powerful features.
Wondershare UniConverter
Loaded with tools. Practically an entire suite. But it’s heavy—your computer feels it—and the interface can overwhelm newcomers.
The Takeaway
Most competitors nail one thing: either simplicity, or power, or value. HD Video Converter Factory Pro is one of the few that bridges all three without compromise.
Real-World Use Cases: Where HD Video Converter Factory Pro Wins
Different audiences come to video converters with very different needs. Here’s how the tool serves each one.
For YouTubers
Quick conversions. Smart compression. Ready-made presets for upload. You end up spending less time waiting and more time making.
Different platforms are picky with formats. This software handles:
Instagram reels
TikTok vertical videos
Facebook ad specs
Story formats
All without manual tweaking.
For Personal Use
Sometimes you just want to convert old clips, shrink giant videos, or send files to someone without clogging their inbox. This tool handles the basics effortlessly.
Final Verdict: Who Wins and Why?
Here’s the straight, distilled answer most people are searching for:
HD Video Converter Factory Pro — the feature set is unmatched for the price.
Easiest for beginners:
Movavi — but limited once you need more power.
Best for advanced users:
Wondershare UniConverter — though heavier and pricier.
Overall winner:
HD Video Converter Factory Pro
It hits the sweet spot between speed, simplicity, capability, and price—a combination competitors rarely achieve at the same time.
FAQs
Is HD Video Converter Factory Pro safe?
Yes. It installs without unwanted extras and has a consistent update record.
Is it better than free tools?
For occasional basic conversions, free tools are fine. For speed, ease of use, 4K support, and workflow tools—HD Video Converter Factory Pro is in a different league.
Does it run on low-end PCs?
Surprisingly well. It’s lightweight compared to many alternatives.
Does it support 4K?
Yes, and it handles high-resolution conversions more smoothly than most budget-friendly tools.
Is the lifetime plan worth it?
If you convert videos regularly, absolutely. It replaces multiple apps.
Products / Tools / Resources
HD Video Converter Factory Pro — The primary tool featured and the most balanced option for value and performance. Enter code: VCF20D to get 20% off.
Movavi Video Converter — Excellent for beginners who want a clean interface.
Wondershare UniConverter — Ideal for users who need a full suite of advanced tools.
HandBrake — Great free option for technically experienced users.
HitPaw Video Converter — Solid but less cost-effective for heavy use.
Comments Off on Fastest DVD to Digital Conversion Tools: Speed Tests & Real Results (2025 Edition)
Why Speed Matters When You’re Converting DVDs in 2025
If you’ve ever sat through a painfully slow DVD conversion, you know the feeling: the minutes drag, the fan kicks on, and suddenly ripping your collection feels like trying to empty the ocean with a coffee mug.
The truth is, most people don’t realize how dramatically DVD conversion speed varies between tools. One program can chew through a disc in eight minutes; another takes nearly an hour — on the same machine.
And as DVDs age, the urgency grows. Discs warp. Layers separate. Playback skips or stops entirely. Once the data is gone, it’s gone.
That’s why speed isn’t just convenience — it’s preservation. The faster you can rip, the faster you protect your library from disappearing. And if you’ve got a shelf overflowing with movies, workouts, documentaries, or family recordings, speed becomes the difference between “I’ll actually finish this” and “forget it.”
This guide walks you through real-world-style speed testing, visual comparisons, and the strengths of each major DVD-to-digital converter in 2025 — so you can pick the one that fits your workflow instead of slowing you down.
How We Evaluated DVD Conversion Speed & Output Quality
To keep things fair, every converter was tested on the exact same hardware and using the same discs — a mix of encrypted, non-encrypted, and gently scratched titles.
The Test System
Windows 11
Intel Core i7
16 GB RAM
GPU acceleration enabled
USB 3.0 external DVD drive
What We Measured
We focused on the things that actually matter when you’re ripping a full DVD collection:
• Total conversion time — from disc load to saved file • Encoding speed (FPS) — a raw indicator of processing strength • Output file size — especially important for long-term storage • Visual clarity — color, detail, motion, and compression behavior • Codec performance — H.264 and HEVC/H.265
The goal wasn’t to create a laboratory-perfect test — but a real one that mirrors the average enthusiast’s experience.
Speed Test Results: Fastest to Slowest
After multiple rounds of ripping, one trend became impossible to ignore: some converters simply operate in a different gear.
WonderFox consistently finished first. Not by seconds — by meaningful margins.
Real-World Speeds
Most DVDs converted in 8–12 minutes
Encoding performance typically 150–210 FPS
Fastest results with H.264 and HEVC/H.265
The program takes full advantage of GPU acceleration and has a knack for bulldozing through copy protection that slows other tools down.
Why It Feels Faster
Smooth hardware acceleration
Intuitive presets for phones, TVs, and tablets
Strong copy-protection handling
Crisp, reliable output every time
If you have a big collection, this is the toolthat lets you make real progress — not just good intentions.
2. WinX DVD Ripper — Exceptionally Fast With GPU Boost
WinX is a favorite for people who want speed without complexity, and its performance doesn’t disappoint.
Real-World Speeds
Most discs finish in 10–15 minutes
Encoding rates range from 120–180 FPS
Where It Excels
Handles scratched and older discs better than most
Great presets
Strong, predictable quality
It’s only a step behind WonderFox — close enough that many users won’t notice the difference unless they’re converting dozens of titles.
3. MakeMKV — Fast Extraction, Giant Files
MakeMKV plays a completely different game. Instead of compressing the video, it extracts the DVD content as-is.
Real-World Speeds
Extracts a disc in 15–25 minutes
No compression at all
Output: 4–8+ GB per movie
Who It’s For
People who care about perfect preservation and plan to compress later in HandBrake. Fast in its own way — but not ideal if you want manageable file sizes immediately.
4. HandBrake — Slowest, But Infinitely Adjustable
HandBrake is a tinkerer’s dream: filters, deinterlacing, advanced codec tuning — everything is tweakable. But you pay for that power with time.
Real-World Speeds
45–60 minutes per DVD
30–60 FPS depending on settings
Who Will Love It
Anyone obsessed with squeezing out the highest possible quality, no matter how long it takes.
Quality Results: What the Eye Can See
Let’s break down how each tool handled the visuals.
Best Overall Balance of Size + Quality
➡️ WonderFox DVD Video Converter Sharp image, great compression, excellent HEVC output.
Best Motion & Action Clarity
➡️ WinX DVD Ripper Handles quick movement incredibly well.
Best True Lossless
➡️ MakeMKV But prepare for enormous files.
Best Customization
➡️ HandBrake Endless control, but slow.
Which Software Fits Which Type of User?
If you just want the fastest reliable rip:
✔️ WonderFox DVD Video Converter
If you want high speed plus great handling for rough discs:
✔️ WinX DVD Ripper
If you’re archiving DVDs for future editing or encoding:
✔️ MakeMKV
If you want total control and don’t mind long waits:
✔️ HandBrake
If you have an entire shelf to digitize:
✔️ WonderFox saves the most hours over time.
A Quick, Clean Workflow for Fast DVD Conversion
Here’s a simple workflow that works well regardless of the software you choose:
1. Insert your DVD
Give it a few seconds to initialize.
2. Launch your converter of choice
It should auto-detect the disc structure.
3. Choose your output format
MP4 (H.264) for universal compatibility
HEVC (H.265) for small file sizes
4. Turn on hardware acceleration
This alone can chop off 30–50% of your total conversion time.
5. Start conversion
Watch the FPS — it tells you almost everything.
6. Store and back up your files
Don’t forget long-term storage:
External drive
NAS
Cloud backup
FAQs: The Questions Everyone Has About Speed
Why do some DVDs take so long?
Scratches, unusual disc structures, and copy protection can drastically slow things down.
Does ripping faster reduce quality?
Modern converters like WonderFox and WinX keep quality steady while speeding up the process.
Which format is better for fast ripping?
H.264 is fastest; H.265 is smaller and usually better long-term.
Will a better DVD drive increase speed?
Yes — an external USB 3.0 drive is a noticeable upgrade from older internal drives.
Products / Tools / Resources
WonderFox DVD Video Converter — fastest all-around tool for quick, consistent DVD-to-digital conversion.Enter code: VCF20D to get 20% off.
WinX DVD Ripper — powerful alternative with excellent handling of older or damaged discs.
MakeMKV — ideal for archivists who want lossless copies.
HandBrake — best for deep customization and advanced encoding.
USB 3.0 External DVD Drive — speeds up disc reading noticeably.
Comments Off on Convert Any DVD to Digital on Windows in Minutes: A Zero-Stress Beginner’s Method
If you’ve still got shelves of DVDs tucked under the TV or stored in a box somewhere, you’re not alone. Those discs often hold years of family movies, comfort-watch favorites, and films that aren’t available on any streaming service. But the truth is, DVDs don’t last forever — and neither do the devices that play them. The simplest way to preserve your collection is to turn those discs into digital files you can watch anywhere.
The good news? You don’t need technical knowledge, complicated software, or hours of trial and error. In fact, converting a DVD on a Windows PC has become so beginner-friendly that most people are surprised by how quickly it all comes together. This guide walks you through the process step-by-step, using a workflow designed specifically for people who want clarity, not confusion.
The Beginner Problem: DVDs, Confusing Tools, and Technical Overload
If you’ve ever opened conversion software and immediately closed it because of unfamiliar settings — bitrates, codecs, deinterlacing, and so on — you’re in good company. Older tools were built for advanced users, and they often left beginners feeling like they’d stumbled into an engineering lab.
Common frustrations include:
Tools that ask for settings you don’t understand
Interfaces that feel like they were designed 15 years ago
Conversions that take hours instead of minutes
DVDs that won’t load because of region locks
Output files that look blurry or stretched
And none of that is your fault. Traditional software expected you to make decisions that only video professionals should have to worry about. Modern DVD-to-digital converters for Windows take the opposite approach — they simplify everything, automate complicated steps, and get out of your way.
The Easiest DVD-to-Digital Workflow for Windows
A truly beginner-friendly converter handles the messy parts for you:
It recognizes the correct main movie title
It applies the best format for everyday devices
It balances speed and quality automatically
It removes confusing terminology
It supports modern Windows hardware for faster conversions
This is why many Windows users lean toward tools like WonderFox DVD Ripper Pro — the software makes decisions on your behalf instead of piling them on top of you.
What gets handled in the background:
GPU acceleration for dramatically faster rips
Ideal MP4 settings for universal playback
Correct title detection on discs with misleading tracks
Support for Smart TVs, laptops, phones, and tablets
Quality optimization without manual tweaking
Instead of hunting through tabs, you follow a short, straightforward workflow — insert disc, choose format, click start.
Step-by-Step: The Zero-Stress DVD-to-Digital Conversion Process
Here’s the breakdown for absolute beginners. No skipped steps. No tech jargon.
1. Insert Your DVD
Give Windows a moment to read it. You don’t need to open anything manually; the converter will spot it instantly.
2. Open your DVD-to-Digital converter
The software scans the disc and finds the real main title for you. Some DVDs hide the movie behind dozens of fake tracks — modern tools cut straight through that.
3. Pick your format: MP4 or MKV
MP4 is the safest option and works everywhere:
Smart TVs
Phones
Tablets
Streaming sticks
Laptops
Cloud storage
MKV is more flexible for collectors because it can store extra audio tracks and subtitles.
Not sure which one to choose? Go with MP4 — it’s the worry-free option.
4. Press “Start”
Once you hit Start, everything happens behind the scenes. GPU acceleration kicks in, the correct codecs are applied automatically, and the conversion usually finishes within 10–20 minutes.
5. Save your digital file
Your newly converted file can be dragged onto:
A USB stick
A Smart TV
A Plex or Jellyfin library
Your phone
A laptop
Your cloud backup folder
You’ve now officially preserved your DVD in a future-proof format — and it took less effort than brewing a pot of coffee.
Choosing the Right Format Without Overthinking It
Let’s strip the complexity away:
MP4 (H.264)
This is the one-size-fits-everyone format. It’s efficient, clean, and universally supported.
MKV
Great for archiving or keeping multiple audio/subtitle tracks.
H.265 (HEVC)
Smaller file sizes, but older devices may not support it.
When in doubt?
MP4 is always the safest call.
Troubleshooting Made Simple
Even straightforward processes can hit small bumps. Here are fixes that don’t require technical knowledge.
“My DVD isn’t loading.”
Wipe the disc
Reinsert the disc
Open the converter after the disc loads
“The video looks stretched.”
Choose Keep Original Aspect Ratio. This fixes nearly every shape issue.
“It’s taking too long.”
Try these quick tweaks:
Close other programs
Make sure GPU acceleration is turned on
Stick with MP4
Most Windows machines speed up significantly with hardware acceleration enabled.
FAQs
Do I need a fast computer?
No. Even older Windows laptops handle DVD conversions well.
Will the digital files work on my phone?
Yes — if it’s MP4, it’ll play on almost any device.
How big are the files?
MP4 Movies: usually 1–2 GB
TV Episodes: 250–500 MB
MKV Backups: 4–6 GB depending on track options
Products / Tools / Resources
WonderFox DVD Ripper Pro – A beginner-friendly Windows DVD converter that automates the complicated parts and produces universal MP4 files.
Enter code: VCF20Dto get 20% off.
Plex / Jellyfin / Emby – Home media server platforms if you want to organize your new digital library.
Google Drive / OneDrive / Dropbox – Helpful for backing up your digital collection and keeping it accessible across devices.
External Hard Drive or NAS – Ideal for storing large DVD archives long-term.
Comments Off on How to Create Professional-Quality Designs in Minutes Without the Hassle
Are you struggling with creating stunning, professional designs for your business, social media, or personal projects? If you’re like many people, the thought of mastering complex design software or spending hours creating a single image can feel overwhelming. Not to mention the high costs associated with hiring freelance designers or purchasing expensive software subscriptions.
But what if there was a way to create professional-grade designs in just minutes, without needing advanced skills, pricey software, or a design team? The solution is simpler than you think, and in this post, we’ll show you exactly how to do it.
Step 1: The Pain of Traditional Design Tools
For many people, creating high-quality designs often means spending hours learning software like Photoshop or Illustrator. These tools, while powerful, come with steep learning curves and can take weeks to master. Plus, the high cost of purchasing licenses or subscriptions for these tools can add up quickly.
So, what’s the alternative?
You need a solution that’s fast, simple, and affordable – one that doesn’t require you to be a design expert. The key is finding the right tool that does the heavy lifting for you, leaving you with time to focus on what really matters: growing your business, brand, or creative project.
Step 2: How to Create Stunning Designs in 3 Simple Steps
Creating beautiful, professional-quality designs doesn’t need to be complicated. Here’s a simple guide to help you get started, even if you have no prior design experience.
Step 1: Get Started with an Easy-to-Use Platform
The first step to creating stunning designs is using a platform that’s designed for people who don’t have the time or expertise to learn complex design software. You don’t need to install anything or worry about complicated features – just sign up and start creating.
Once you’re on the platform, you’ll find an easy-to-use interface that walks you through every step of the process. No overwhelming menus, no confusing settings – just everything you need to create high-quality designs, ready to go.
Step 2: Use Simple Commands to Create Your Design
Once you’re set up, it’s time to create your design. The key is using plain English commands to tell the platform exactly what you want. For example, you could type:
“Create a logo with a modern, minimalist style in blue and white.”
“Generate a product image with a white background and soft shadows.”
“Design a social media banner with a tropical beach scene.”
In just 1-2 seconds, the platform generates your image, all done for you. No need to adjust layers, worry about colors, or spend time figuring out complex settings.
Step 3: Edit Your Design with Just a Few Clicks
Once you have your initial design, the next step is to make any tweaks or adjustments. With a few simple commands, you can edit your design, such as:
“Change the background to a sunset at the beach.”
“Add a text box with the title ‘Summer Sale’ in bold font.”
“Make the logo more vibrant with a gradient effect.”
Editing is just as easy as creating. With every change you make, the design updates instantly, giving you the flexibility to fine-tune the details without wasting any time.
Step 3: When You Need the Right Tool – How NanoBanana AI Completes the Picture
At this point, you’ve seen how easy it can be to create and edit stunning designs without needing advanced skills or hours of work. So, how do you achieve the professional quality and speed that make your designs stand out?
That’s where the right tool comes in. NanoBanana AIprovides all the capabilities you need in one simple platform. By integrating multiple top-tier AI models, it ensures that your designs are always high-quality, consistent, and delivered in a matter of seconds.
With NanoBanana AI, you can access a full commercial license, meaning you can sell or use your designs without restrictions. Plus, you get unlimited access, meaning there are no monthly fees or hidden costs. Whether you’re creating logos, banners, product images, or social media posts, NanoBanana AI gives you the flexibility to make anything you need without the traditional complexities of design software.
Conclusion: Start Creating Stunning Designs Today
If you’ve been frustrated by complicated design tools, high costs, or a lack of time, it’s time for a change. You don’t need advanced skills, expensive software, or a design team to create professional-quality designs.
With the right tools and a simple, effective process, you can generate stunning visuals in just minutes – and use them to elevate your business, brand, or personal projects. Whether you’re creating a logo, product image, or social media graphic, the process is easier than you think.
To get started, all you need is the right platform to guide you – one that takes care of the technical stuff and lets you focus on your vision. NanoBanana AI is the ideal solution, offering you professional-quality designs with a few clicks, and unlimited access to all the tools you need.
Ready to start designing like a pro? Click here to get access to NanoBanana AI and unlock your creative potential. Plus, don’t forget to use my $4 discount code: NB4OFF to save on your purchase today!
Comments Off on How to Create Viral Social Media Content Step-by-Step
Social media feels more competitive than ever. Every day, millions of posts flood Facebook, Instagram, TikTok, and LinkedIn — yet only a few manage to go viral, spark conversations, and drive real engagement.
If you’ve ever poured hours into designing a graphic only to watch it flop, you’re not alone.
The truth is:
Most creators and businesses struggle with time (posting consistently).
Many lack design skills to make content look professional.
And most don’t have a system to streamline the process.
This guide will walk you through exactly how to create visuals that stand out and get shared — without needing advanced design skills. I’ll also show you a powerful tool (with a $40 OFF discount) that makes the whole process much easier.
Why Visual Content Is Crucial on Social Media
Before we dive into the steps, let’s look at why visual content matters more than ever:
Visuals outperform text-only posts: People process visuals 60,000x faster than text. Posts with images or videos get far more engagement.
Brand recognition grows with visuals: Colors, fonts, and logos stick in people’s memory longer than words alone.
Visual storytelling drives conversions: From memes to motivational quotes, visuals trigger emotion — and emotion drives action.
If you’re not prioritizing visuals, you’re leaving money and engagement on the table.
Step 1: Identify the Pain Point
The biggest obstacles most creators face are:
Time pressure: Consistently posting daily or weekly is exhausting.
Skill gap: Tools like Photoshop are complex and time-consuming.
Overwhelm: Managing multiple platforms at once feels like a full-time job.
This is why so many people give up on content consistency — but consistency is exactly what drives growth.
Step 2: The Step-by-Step Guide to Creating Viral Content
Tip #1: Start with Proven Templates
Stop staring at a blank canvas. Proven templates save time and already follow best practices for engagement.
Meme templates → Add humor and relatability.
Motivational quotes → Highly shareable across all industries.
Cinemagraphs → Eye-catching animations that pop in feeds.
Templates aren’t “cheating” — they’re the shortcut to getting results faster.
Tip #2: Keep Your Branding Consistent
Brand recognition is built through repetition and consistency.
Use brand colors across all posts.
Stick with the same fonts for text overlays.
Always include your logo so even shared content leads back to you.
A consistent look makes your content unmistakably yours.
Tip #3: Automate Your Posting
If you’re still manually posting every update, burnout is inevitable. The smart way is to batch your content and schedule it ahead of time.
Plan content weekly or monthly.
Schedule across platforms.
Free yourself to focus on strategy, not busywork.
👉 At this point, you’ll need a tool that combines templates, branding, and scheduling into one streamlined system.
Step 3: Meet the Tool That Simplifies It All
That’s where VisualReel comes in.
VisualReel is a cloud-based content creation and automation platform that takes the heavy lifting off your shoulders. Here’s what it does:
Ready-made templates: Create memes, quote-pics, cinemagraphs, and more in minutes.
Easy customization: Add your logo, tweak colors, and align visuals with your brand identity.
Built-in automation: Schedule and auto-post to multiple social media accounts — no need for third-party schedulers.
Massive content library: Access curated images, quotes, and clips to use instantly.
Performance analytics: See which visuals perform best and double down on what works.
💡 Special bonus for my readers: You can try VisualReel with an exclusive $40 OFF discount using my link. It’s the easiest way to start creating professional-grade content without breaking the bank.
Real-World Use Cases
Who benefits most from VisualReel? Pretty much anyone who wants to grow online:
Small business owners → Save money on agencies and design everything in-house.
Freelancers → Offer content creation as a paid service for clients.
Agencies → Manage multiple clients’ content in one streamlined platform.
Content creators → Build a consistent online presence and grow your personal brand.
Conclusion
Going viral on social media isn’t just luck — it’s about consistency, creativity, and smart tools. By following these steps:
Start with templates that work.
Keep your branding consistent.
Automate your posting.
…you’ll set yourself up for long-term growth and engagement.
And with VisualReel, you get all of this in one place — without needing design skills or juggling multiple apps.
Q1: Do I need design experience to use VisualReel? No. VisualReel is beginner-friendly, with drag-and-drop templates that anyone can use.
Q2: Which social platforms can I post to with VisualReel? You can create and schedule content for Facebook, Instagram, Twitter/X, LinkedIn, and more.
Q3: Can I use VisualReel for client work? Yes. Many freelancers and agencies use VisualReel to manage content creation and posting for clients.
Q4: How does the $40 OFF discount work? Through my special link, you’ll get $40 off the regular price of VisualReel. It’s a limited-time offer designed to help new users get started.
Q5: Is there a learning curve? VisualReel is intuitive, but it also comes with tutorials and training to help you get results faster.
Comments Off on How to Use Murf AI Text-to-Speech & Voice Generator (A Complete Walkthrough)
If you’ve ever tried to make a video, podcast, or course, you’ve probably hit the same wall as the rest of us: the voiceover problem.
You’ve got a script, you’ve got the visuals, but the audio? That’s tricky. Hiring a voice actor is expensive. Recording your own voice takes forever (and let’s be honest—most of us hate how we sound on mic). And old-school text-to-speech tools? They sound like Siri’s long-lost cousin.
Murf is an AI-powered text-to-speech (TTS) and voice generator that turns your words into natural-sounding audio. It doesn’t sound like a robot. It doesn’t take hours. And it doesn’t cost a fortune. Whether you’re making YouTube videos, training materials, marketing ads, or just want to play around with realistic AI voices, Murf makes it super simple.
So today, I’m going to walk you through exactly how to use Murf AI step by step. Think of this as your go-to guide if you’re brand new. I’ll show you what to click, what to tweak, and some pro tips along the way to get that polished, professional sound without touching a microphone.
Getting Started with Murf AI
The first step is signing up. Head to Murf.ai and create a free account. You don’t have to pay anything to start—they give you 10 minutes of free voice generation so you can test the waters.
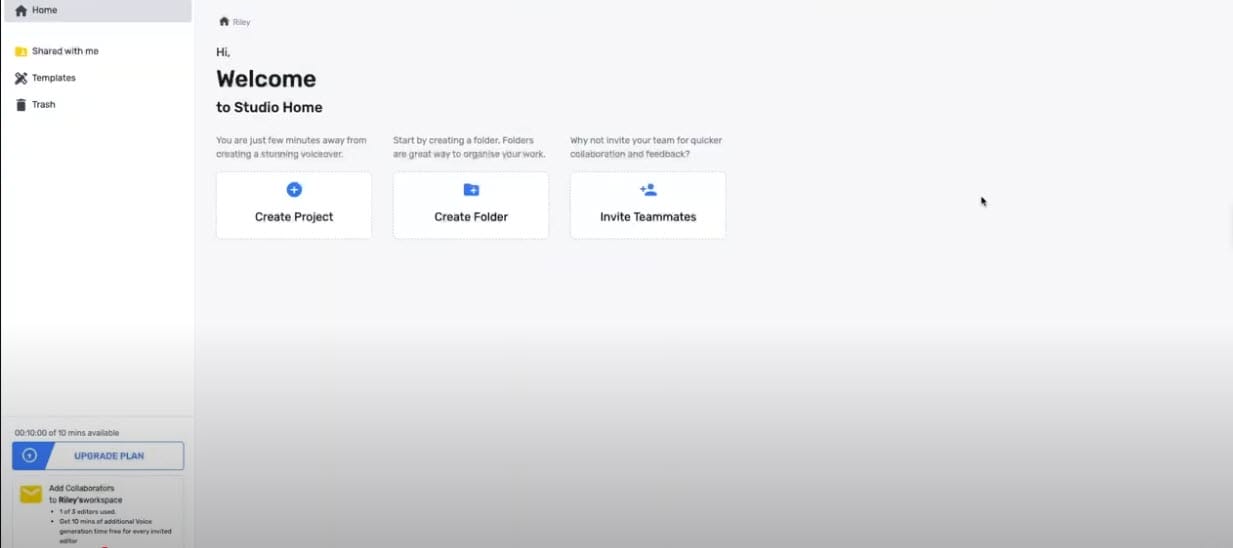
Once you’re logged in, you’ll be in Murf Studio, which is their workspace. This is where you’ll create projects, paste your scripts, pick voices, and fine-tune the audio. Think of it like a Google Doc, but instead of exporting a PDF, you export a professional voiceover.
Step 1: Create a New Project
Inside Murf Studio, click “Create Project.” Give it a name that makes sense, like “Lesson 1 Voiceover” or “Marketing Video VO.”
Projects help you stay organized—especially if you’re planning to make multiple files (say, a whole course with dozens of modules). Each project holds your script, your chosen voice, and any extras like background music or visuals.
Step 2: Add Your Script
In the project editor, you’ll see a text box. This is where the magic starts. Paste your script in here, or type directly if you’re writing from scratch.
A few tips for writing scripts that sound good when read by AI:
Keep sentences short and snappy.
Write like you’d actually speak, not like a textbook.
Break lines where you want natural pauses.
Example:
Hey everyone, welcome back to the channel!
Today, we’re diving into the basics of video editing.
And trust me—you don’t need fancy tools to get started.
Notice how that reads more conversational than a wall of text? That’s key.
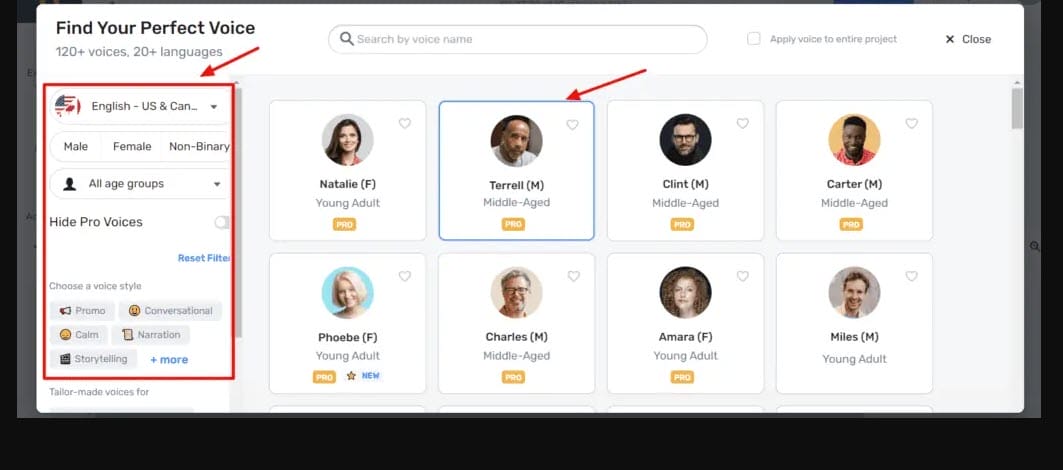
Step 3: Pick Your Voice
Now for the fun part—choosing a voice. Murf has over 300 voices across 30+ languages. That means you’re not stuck with just “generic American male voice.” You can pick from a wide range of accents, genders, tones, and styles.
Want a calm narrator for an audiobook? They’ve got it. Need a lively, energetic tone for a YouTube intro? Covered. Looking for a professional corporate voice for training modules? Easy.
Just click on a voice to preview it. Once you find one you like, select it for your script. You can even assign different voices to different sections if you want multiple narrators.
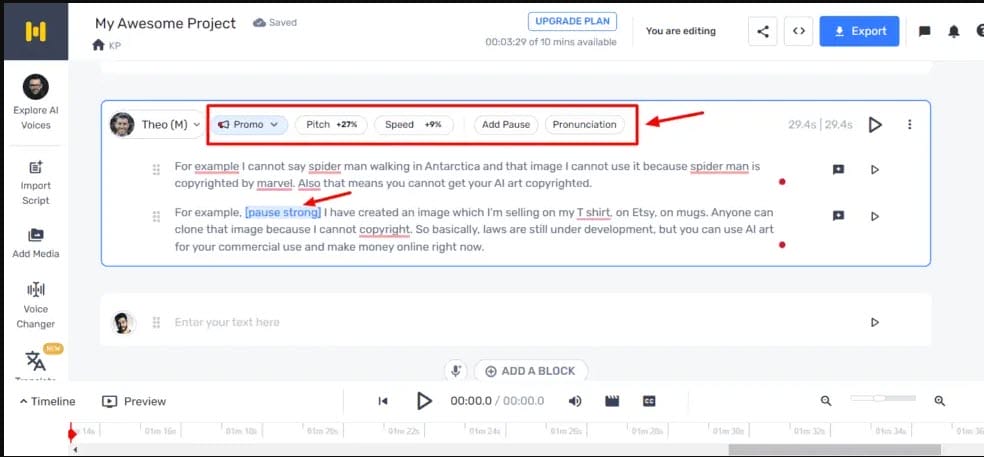
Step 4: Customize How It Sounds
Here’s where Murf really shines. It’s not just text in → audio out. You get a ton of control to make your voiceover sound natural:
Speed – Slow it down for a thoughtful pace, or speed it up for casual, upbeat content.
Pitch – Adjust higher or lower depending on the vibe you want.
Emphasis – Make certain words stand out.
Pauses – Insert breaks so it doesn’t sound rushed.
Pronunciation – If Murf stumbles on a tricky word or brand name, you can fix it manually.
This is the difference between sounding robotic and sounding real. Small tweaks here make a massive difference.
Step 5: Add Music or Visuals (Optional)
If you’re just exporting audio, you can skip this step. But if you want to level things up, Murf also lets you:
Add background music from their built-in library (or upload your own).
Import slides, images, or videos and sync them with your voiceover.
Create a finished presentation or video, all inside Murf Studio.
This is a game-changer if you don’t want to bounce between multiple tools.
Step 6: Preview Your Work
Click Preview and listen. This is where you catch little things: maybe it’s reading too quickly, maybe a sentence needs a pause, maybe one word sounds flat.
Go back, tweak, and re-preview until it flows naturally. Don’t be afraid to experiment—it usually takes a few tries to get it perfect.
Step 7: Export Your Voiceover
Happy with it? Time to download. Click Export and choose your format:
MP3 or WAV for audio-only projects
Video file if you’ve added visuals
And just like that, you’ve got a professional voiceover ready to use in your video editor, podcast software, or LMS platform.
Pro Tips to Get the Most Out of Murf
After playing with Murf for a while, here are some little tricks that make a big difference:
Write conversationally – The AI does its best work when the script feels natural.
Use multiple voices – Great for dialogue or to break monotony in long videos.
Play with tone options – Some voices have styles like “narrative” or “promotional.” Try them out.
Don’t skip pauses – Silence adds rhythm and makes your audio breathe.
Batch your projects – If you’re making a course, set up all your scripts in one go.
Where Murf Fits in Real Life
Still wondering if this tool is for you? Here’s how different people are using Murf every day:
YouTubers – Narrating videos without recording themselves.
Teachers and trainers – Turning lesson scripts into voiceovers for e-learning.
Marketers – Making ad voiceovers or explainer videos on the fly.
Podcasters – Generating episodes without needing a mic or editing booth.
Businesses – Adding professional audio to presentations and internal training.
Basically, if your work involves audio, Murf cuts the hassle.
Wrapping It Up
Here’s the thing: voiceovers used to be intimidating. Either you’d spend hundreds of dollars outsourcing it, or you’d cringe at the sound of your own voice in recordings. But with Murf, it’s… easy.
You type your script, pick a voice, tweak a few settings, and boom—you’ve got something that sounds like it came out of a studio.
And honestly? That’s kind of game-changing.
So if you’ve been putting off that YouTube channel, that course, that podcast, or even that marketing video because of the voiceover part—don’t. Try Murf AI.
You don’t even have to pay to see if it works for you. Just grab the free plan, mess around with a few scripts, and hear it for yourself.
Because the truth is, the only thing standing between your ideas and a polished, professional final product… might just be a voice.
✨ Give Murf AI a try today and see how easy it is to create voiceovers that actually sound human.
Comments Off on How to Create a Blog for Free Using Systeme.io in 2025 (Step-by-Step Guide)
So, you’ve decided it’s finally time to start that blog you’ve been thinking about. Maybe you want to share your knowledge, build a personal brand, attract clients, or just have a creative outlet. The problem? You don’t want to spend a ton of money upfront on web hosting, themes, and all the other tech stuff that usually comes with blogging.
That’s where Systeme.io comes in. If you’ve never heard of it, Systeme.io is an all-in-one online business platform. People mostly talk about it for funnels, email marketing, and digital products, but here’s the cool part: you can actually build a fully functional blog on it for free. Yep—no domain costs, no hosting fees, and no messing around with WordPress plugins.
✨ If you’ve been dreaming about sharing your ideas online, now’s the time. By the end of this post, you’ll have your very own blog — without spending a dime.
In this guide, I’ll walk you through exactly how to set up your blog using Systeme.io in 2025. We’ll cover everything from creating your account, designing your blog, writing your first post, and even how to make money from it down the line. Think of this as your no-stress, beginner-friendly roadmap.
Why Choose Systeme.io for Blogging?
Before we dive in, let’s talk about why Systeme.io is a great choice if you’re starting from scratch.
Completely free to start: Their free plan isn’t a “teaser” — you actually get real features like a website, unlimited blogging, email marketing, and funnels.
All-in-one: No need to juggle WordPress, hosting providers, plugins, email platforms, and landing page builders. It’s all under one roof.
Easy to use: Drag-and-drop editor, no coding skills required.
Scales with you: You can start free and upgrade only if your blog grows and you want more advanced features.
Now let’s get into the fun part — building your blog.
Confirm your email through the verification link they send.
That’s it. You’re now inside the Systeme.io dashboard. This is your control center where you’ll manage everything — your blog, website, email list, funnels, and products (if you want to sell later).
Step 2: Set Up Your Website (This Will Be Your Blog)
Systeme.io organizes everything around “websites.” Your blog will be built on one of these sites.
In your dashboard, go to the “Websites & Funnels” tab.
Click “Create” → choose “Website.”
Name your website something simple like “My Blog” (you can change it later).
👉 On the free plan, you’ll get a Systeme.io subdomain (something like yourname.systeme.io). If you want your own domain (like yourname.com), you can add that later when you’re ready to invest.
Step 3: Choose a Blog-Friendly Template
Systeme.io has a bunch of templates designed for funnels, sales pages, and websites. The good news? Many of these work perfectly for blogs.
After creating your website, Systeme.io will ask you to pick a template.
Browse through the options and choose one with a clean, blog-style layout.
Look for templates with a homepage, navigation menu, and a blog section.
Once you’ve picked one, click “Use This Template.”
Don’t worry if it’s not perfect—you’ll be customizing it in the next step.
Step 4: Customize Your Website Design
Here’s where you make your blog look like your blog.
Go back to your Websites & Funnels → select your new site → click “Edit.”
The drag-and-drop editor will open.
From here you can:
Change colors and fonts: Pick something that matches your vibe.
Update the logo: If you don’t have one yet, just use a text logo (you can design one later using Canva).
Edit your homepage: Add a headline that tells people what your blog is about.
Set up navigation: Add links like “Home,” “Blog,” “About,” and “Contact.”
💡 Keep it simple. Don’t overcomplicate the design. A clean, easy-to-read blog will keep visitors around longer.
Step 5: Enable the Blog Feature
Systeme.io has a built-in blogging feature — no plugins needed.
In your website settings, go to “Blog”.
Click “Create Blog.”
Choose a layout (grid or list view works well).
Save your settings.
Boom! You now officially have a blog section on your site. It will automatically generate a blog page (usually yourwebsite.com/blog) where all your posts will appear.
Step 6: Write Your First Blog Post
Now for the fun part—actually writing content.
Go to your Blog tab inside your website settings.
Click “Add Post.”
Fill in the basics:
Title (make it catchy but clear)
Slug (the URL of your post, like /how-to-start-a-blog)
Author name
Publish date
In the editor, write your post just like you would in Google Docs. You can:
Add text, images, and headings.
Format with bullet points, quotes, and links.
Embed videos or GIFs.
When you’re done, hit Publish.
🌱 Don’t overthink it — just hit publish. Your first blog post doesn’t need to be perfect; it just needs to exist. Once it’s live, you’ll feel that momentum to keep going.
Step 7: Customize Your Blog Settings
To make your blog look professional, tweak a few extra settings.
Categories: Create categories like “Lifestyle,” “Business,” “Travel,” etc. (depending on your niche). This helps organize posts.
SEO settings: In each blog post, add a meta title and description so Google knows what your post is about.
Featured images: Upload a thumbnail image for each post to make your blog look polished.
Step 8: Connect Your Blog to Email Marketing
One of the biggest mistakes new bloggers make is not building an email list from day one. With Systeme.io, email marketing is built in — no need for Mailchimp or ConvertKit.
Go to Emails → Campaigns.
Create a simple welcome campaign (something like “Thanks for subscribing! Here’s what my blog is about”).
Add a signup form to your blog (you can drag-and-drop it onto your homepage, sidebar, or under posts).
Now every time someone reads your blog and subscribes, they’ll automatically join your email list.
✨ Even if you don’t know what to sell yet, collecting emails gives you options later. Future you will thank you for starting early.
Step 9: Share Your Blog With the World
What’s the point of blogging if nobody sees it? Systeme.io makes it easy to get traffic.
Social Media: Share your blog link on Instagram, TikTok, LinkedIn, or Twitter.
Email Newsletter: Send your posts to subscribers with one click.
SEO (Search Engine Optimization): Write posts around keywords people are searching for in Google.
💡 Start with 3–5 solid blog posts before launching. That way, new visitors have multiple articles to read and are more likely to subscribe.
Step 10: Monetize Your Blog (Optional but Fun)
Systeme.io isn’t just for blogging — it’s built for online business. Once your blog starts getting traffic, here are a few ways you can make money:
Affiliate marketing: Promote products and earn commissions. Add affiliate links to your blog posts.
Digital products: Sell ebooks, online courses, or templates directly through Systeme.io.
Services: If you’re a coach, freelancer, or consultant, you can create booking pages and funnels.
Ads: If your traffic grows, you can apply for Google AdSense or Mediavine.
💡 Even if you’re just starting for fun, remember — your blog could turn into more down the road. Whether it’s a side hustle or even a full-time gig, Systeme.io has the tools to grow with you.
Pro Tips for Blogging on Systeme.io in 2025
Consistency beats perfection: It’s better to publish one solid post a week than stress about making everything perfect.
Use visuals: Break up long text with images, infographics, and videos.
Plan ahead: Create a simple content calendar so you’re not stuck thinking “What should I write about?” every week.
Leverage AI: Tools like ChatGPT (😉) can help you brainstorm titles, outlines, or even rough drafts to speed up the process.
Engage your readers: Ask questions at the end of posts, reply to comments, and connect on social media.
Common Questions About Blogging on Systeme.io
1. Do I need my own domain name? Not at first. You can use Systeme.io’s free subdomain. Later, if you want to look more professional, you can buy your own domain and connect it.
2. Can I move my blog from Systeme.io to WordPress later? Yes, you can always migrate if you outgrow the platform, but many people never need to because Systeme.io has everything built in.
3. Is Systeme.io really free forever? Yes. Their free plan includes 1 website, unlimited blogging, email marketing for up to 2,000 contacts, and funnels. If you need advanced features, you can upgrade, but free works for most beginners.
Wrapping It Up
Starting a blog in 2025 doesn’t have to be complicated or expensive. With Systeme.io, you can have a clean, professional-looking blog live in less than an hour — without paying a dime.
Here’s the quick recap:
Sign up for a free account.
Create your website.
Pick a template.
Customize your design.
Enable the blog feature.
Write and publish your first post.
Add categories, SEO, and images.
Connect email marketing.
Share your blog.
Monetize when ready.
🚀 You don’t need to wait for the “perfect” time. The best way to learn blogging is to start today. Head over to Systeme.io, grab your free account, and give yourself permission to finally share your voice with the world.
Ready to Start Your Blog?
Creating a blog doesn’t have to be complicated or expensive. With Systeme.io, you can launch in less than an hour, share your story, and start connecting with readers — all for free.
With years of experience exploring the best ways to save money and enhance daily life, I created this blog to share the tips, tricks, and tools that have made a real difference for me—and can help you too.
I focus on exploring the latest AI tools, marketing platforms, and practical strategies to make life easier, smarter, and more efficient. From writing aids like Rytr to marketing platforms like GoHighLevel, I cover the best tools that can help businesses grow and individuals thrive.
Feel free to browse through the blog, sign up for weekly tips, and reach out if you have any questions. Together, let’s make positive changes toward a more efficient, cost-effective, and fulfilling life!