Comments Off on How to Use Murf AI Text-to-Speech & Voice Generator (A Complete Walkthrough)
If you’ve ever tried to make a video, podcast, or course, you’ve probably hit the same wall as the rest of us: the voiceover problem.
You’ve got a script, you’ve got the visuals, but the audio? That’s tricky. Hiring a voice actor is expensive. Recording your own voice takes forever (and let’s be honest—most of us hate how we sound on mic). And old-school text-to-speech tools? They sound like Siri’s long-lost cousin.
Murf is an AI-powered text-to-speech (TTS) and voice generator that turns your words into natural-sounding audio. It doesn’t sound like a robot. It doesn’t take hours. And it doesn’t cost a fortune. Whether you’re making YouTube videos, training materials, marketing ads, or just want to play around with realistic AI voices, Murf makes it super simple.
So today, I’m going to walk you through exactly how to use Murf AI step by step. Think of this as your go-to guide if you’re brand new. I’ll show you what to click, what to tweak, and some pro tips along the way to get that polished, professional sound without touching a microphone.
The first step is signing up. Head to Murf.ai and create a free account. You don’t have to pay anything to start—they give you 10 minutes of free voice generation so you can test the waters.
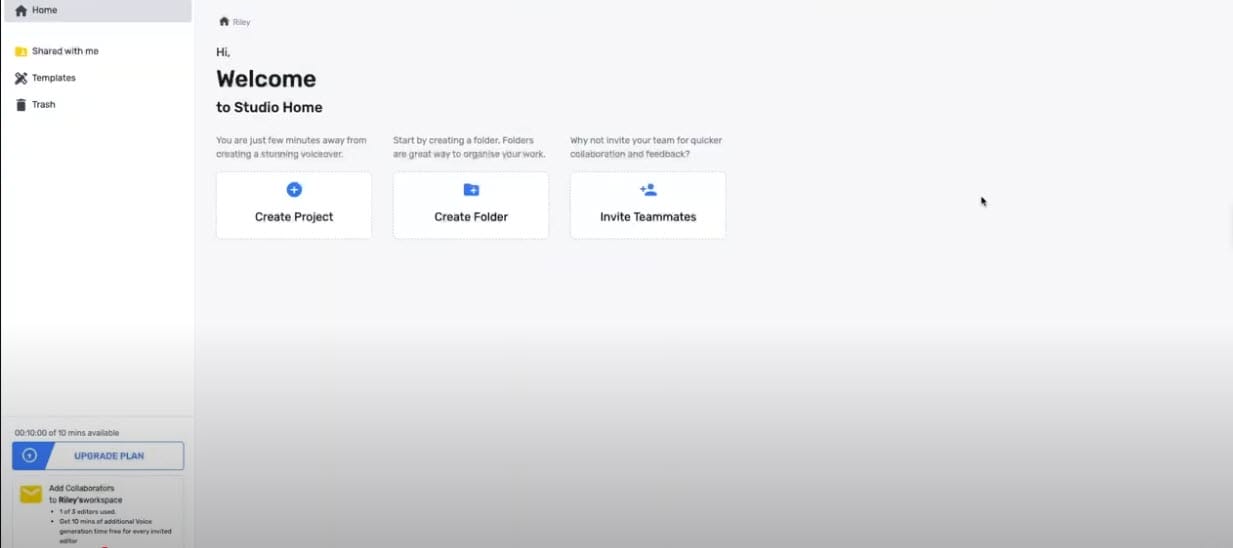
Once you’re logged in, you’ll be in Murf Studio, which is their workspace. This is where you’ll create projects, paste your scripts, pick voices, and fine-tune the audio. Think of it like a Google Doc, but instead of exporting a PDF, you export a professional voiceover.
Step 1: Create a New Project
Inside Murf Studio, click “Create Project.” Give it a name that makes sense, like “Lesson 1 Voiceover” or “Marketing Video VO.”
Projects help you stay organized—especially if you’re planning to make multiple files (say, a whole course with dozens of modules). Each project holds your script, your chosen voice, and any extras like background music or visuals.
Step 2: Add Your Script
In the project editor, you’ll see a text box. This is where the magic starts. Paste your script in here, or type directly if you’re writing from scratch.
A few tips for writing scripts that sound good when read by AI:
Keep sentences short and snappy.
Write like you’d actually speak, not like a textbook.
Break lines where you want natural pauses.
Example:
Hey everyone, welcome back to the channel!
Today, we’re diving into the basics of video editing.
And trust me—you don’t need fancy tools to get started.
Notice how that reads more conversational than a wall of text? That’s key.
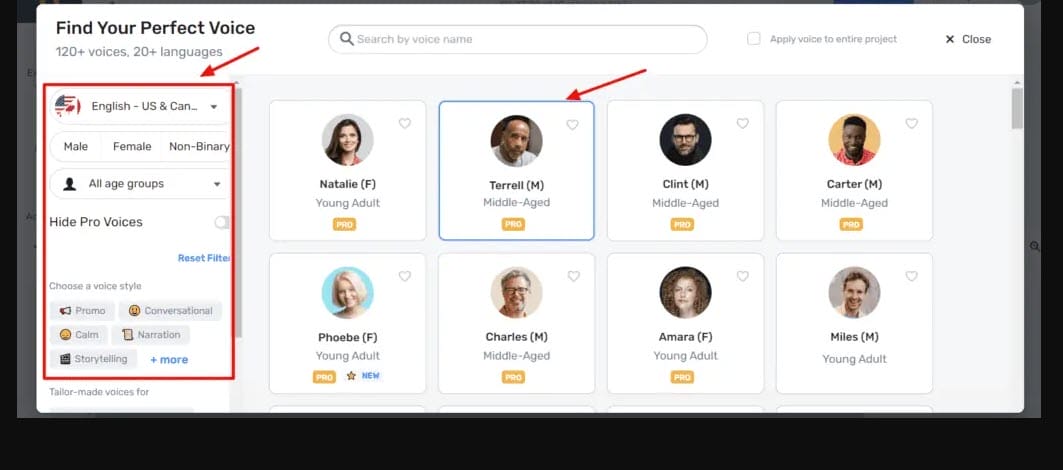
Step 3: Pick Your Voice
Now for the fun part—choosing a voice. Murf has over 300 voices across 30+ languages. That means you’re not stuck with just “generic American male voice.” You can pick from a wide range of accents, genders, tones, and styles.
Want a calm narrator for an audiobook? They’ve got it. Need a lively, energetic tone for a YouTube intro? Covered. Looking for a professional corporate voice for training modules? Easy.
Just click on a voice to preview it. Once you find one you like, select it for your script. You can even assign different voices to different sections if you want multiple narrators.
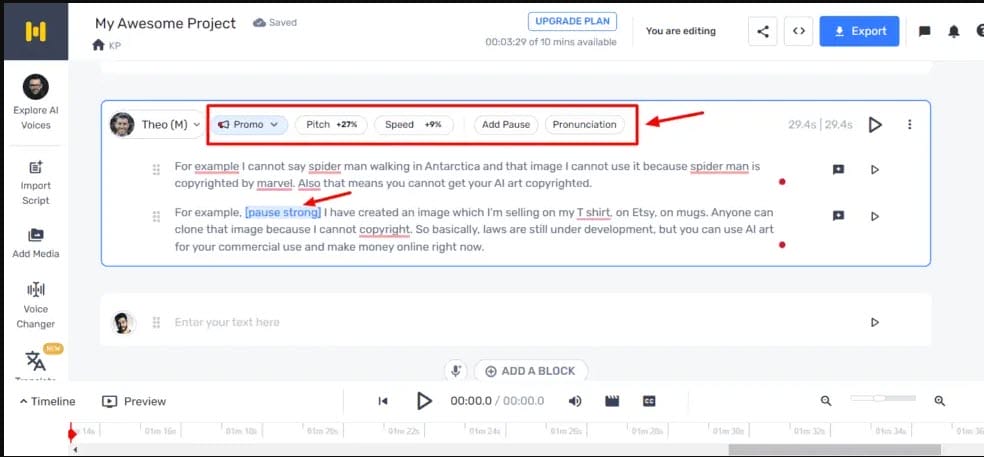
Step 4: Customize How It Sounds
Here’s where Murf really shines. It’s not just text in → audio out. You get a ton of control to make your voiceover sound natural:
Speed – Slow it down for a thoughtful pace, or speed it up for casual, upbeat content.
Pitch – Adjust higher or lower depending on the vibe you want.
Emphasis – Make certain words stand out.
Pauses – Insert breaks so it doesn’t sound rushed.
Pronunciation – If Murf stumbles on a tricky word or brand name, you can fix it manually.
This is the difference between sounding robotic and sounding real. Small tweaks here make a massive difference.
Step 5: Add Music or Visuals (Optional)
If you’re just exporting audio, you can skip this step. But if you want to level things up, Murf also lets you:
Add background music from their built-in library (or upload your own).
Import slides, images, or videos and sync them with your voiceover.
Create a finished presentation or video, all inside Murf Studio.
This is a game-changer if you don’t want to bounce between multiple tools.
Step 6: Preview Your Work
Click Preview and listen. This is where you catch little things: maybe it’s reading too quickly, maybe a sentence needs a pause, maybe one word sounds flat.
Go back, tweak, and re-preview until it flows naturally. Don’t be afraid to experiment—it usually takes a few tries to get it perfect.
Step 7: Export Your Voiceover
Happy with it? Time to download. Click Export and choose your format:
MP3 or WAV for audio-only projects
Video file if you’ve added visuals
And just like that, you’ve got a professional voiceover ready to use in your video editor, podcast software, or LMS platform.
Pro Tips to Get the Most Out of Murf
After playing with Murf for a while, here are some little tricks that make a big difference:
Write conversationally – The AI does its best work when the script feels natural.
Use multiple voices – Great for dialogue or to break monotony in long videos.
Play with tone options – Some voices have styles like “narrative” or “promotional.” Try them out.
Don’t skip pauses – Silence adds rhythm and makes your audio breathe.
Batch your projects – If you’re making a course, set up all your scripts in one go.
Where Murf Fits in Real Life
Still wondering if this tool is for you? Here’s how different people are using Murf every day:
YouTubers – Narrating videos without recording themselves.
Teachers and trainers – Turning lesson scripts into voiceovers for e-learning.
Marketers – Making ad voiceovers or explainer videos on the fly.
Podcasters – Generating episodes without needing a mic or editing booth.
Businesses – Adding professional audio to presentations and internal training.
Basically, if your work involves audio, Murf cuts the hassle.
Wrapping It Up
Here’s the thing: voiceovers used to be intimidating. Either you’d spend hundreds of dollars outsourcing it, or you’d cringe at the sound of your own voice in recordings. But with Murf, it’s… easy.
You type your script, pick a voice, tweak a few settings, and boom—you’ve got something that sounds like it came out of a studio.
And honestly? That’s kind of game-changing.
So if you’ve been putting off that YouTube channel, that course, that podcast, or even that marketing video because of the voiceover part—don’t. Try Murf AI.
You don’t even have to pay to see if it works for you. Just grab the free plan, mess around with a few scripts, and hear it for yourself.
Because the truth is, the only thing standing between your ideas and a polished, professional final product… might just be a voice.
✨ Give Murf AI a try today and see how easy it is to create voiceovers that actually sound human.
With years of experience exploring the best ways to save money and enhance daily life, I created this blog to share the tips, tricks, and tools that have made a real difference for me—and can help you too.
I focus on exploring the latest AI tools, marketing platforms, and practical strategies to make life easier, smarter, and more efficient. From writing aids like Rytr to marketing platforms like GoHighLevel, I cover the best tools that can help businesses grow and individuals thrive.
Feel free to browse through the blog, sign up for weekly tips, and reach out if you have any questions. Together, let’s make positive changes toward a more efficient, cost-effective, and fulfilling life!